How to Take a Great Headshot at Home
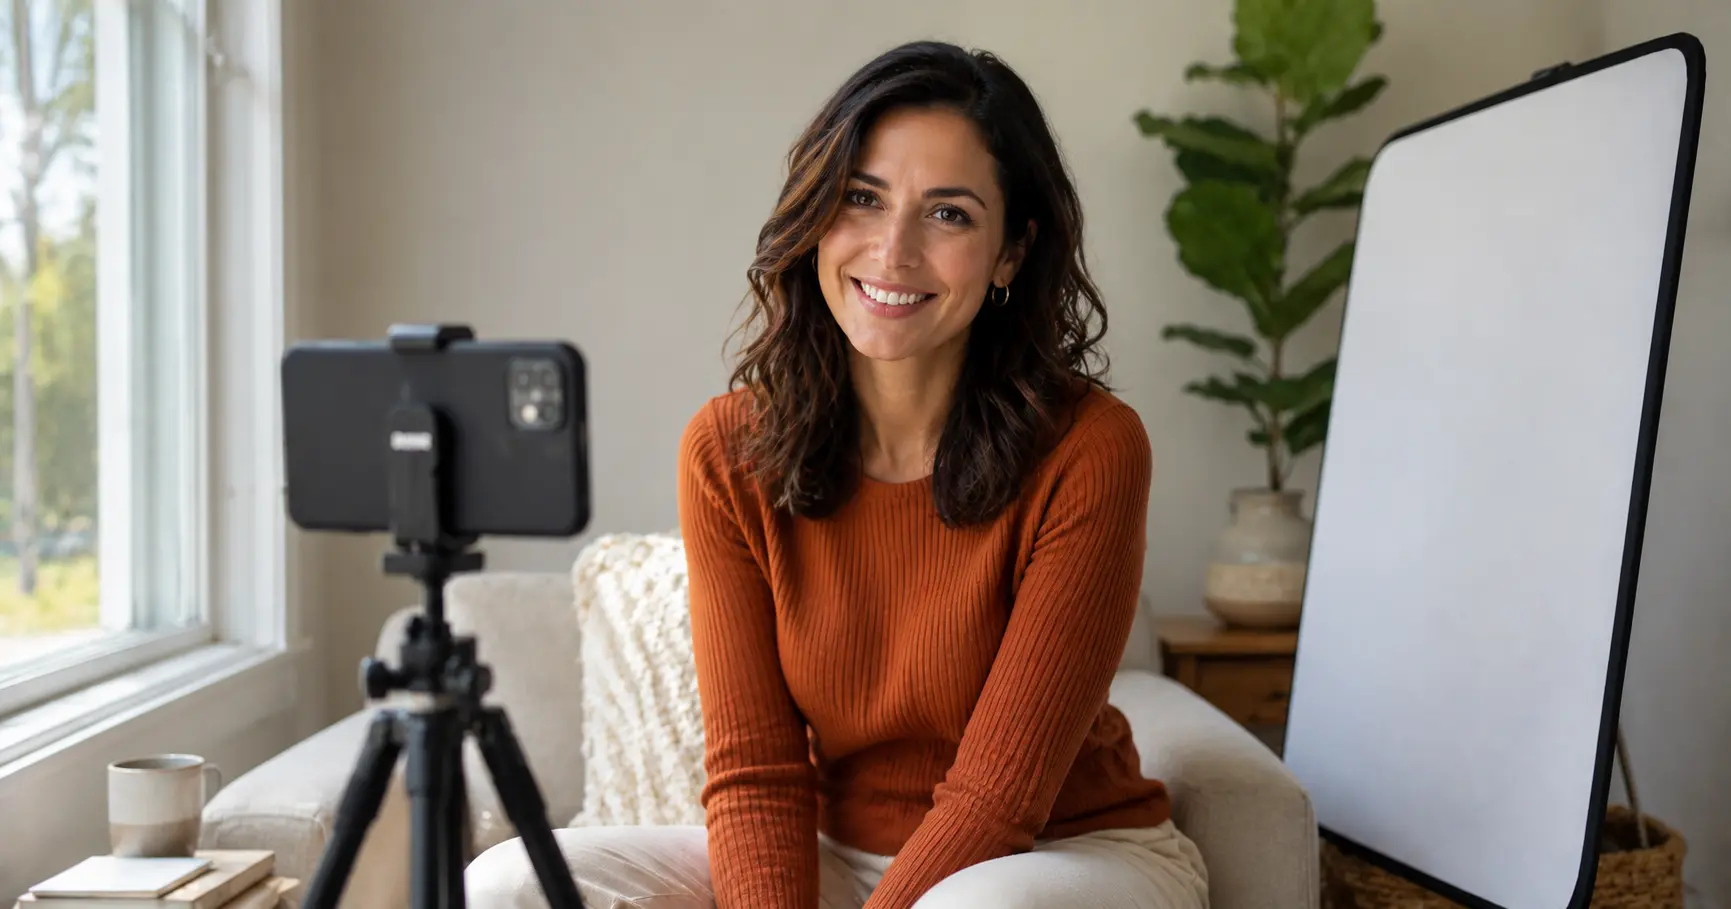
You can take a great headshot at home in under an hour using nothing more than your smartphone, a window, and a clean wall. Position yourself facing the window for soft, even light, prop your phone on a stack of books or a tripod, set the self-timer, and you have everything you need to get started.
The steps below walk through every decision — background, lighting, camera setup, posing, wardrobe, and editing — so your DIY result looks polished rather than improvised.
Why the at-home approach is different
A studio session gives you controlled lighting and a photographer who coaches you in real time. A home shoot gives you something equally valuable: unlimited time and zero performance pressure. You can shoot 100 frames across an afternoon, experiment freely, and delete anything that doesn't work.
The catch is that you have to make deliberate choices a photographer would normally make for you. This guide covers each of those choices.
If you want to compare the DIY route with a traditional studio session, see our breakdown of AI vs traditional headshots.
Step 1: Choose your background
A cluttered background pulls attention away from your face. The goal is a surface that is neutral, consistent in color, and slightly out of focus.
What works well at home:
- A plain painted wall (white, light grey, or warm beige)
- A bedsheet or flat curtain pinned taut to eliminate wrinkles
- A door or section of wall with no frames or outlets in frame
What to avoid:
- Bookshelves, kitchen counters, or anything with many small objects
- Patterned wallpaper or bright accent walls
- Outdoor backgrounds unless the light and clutter are carefully managed
Move at least two to three feet away from the wall behind you. This small gap lets the background fall slightly soft when you are in sharp focus, which looks far more professional than being plastered against a flat surface.
Step 2: Set up your lighting
Lighting is the single biggest factor separating a great headshot from a snapshot.
Use a window as your key light
A large window on an overcast day produces soft, wrapping light that is flattering to most skin tones. Position yourself so the window is roughly 45 degrees to one side of your face, slightly in front of you — not directly to the side, and not directly behind you.
- Face toward the window, then rotate your body about 45 degrees away from it. Turn your head back toward the camera.
- The side of your face closer to the window will be brighter; the far side will have a gentle shadow.
- If the shadow is too deep, place a large white card, a white foam board, or even a white bedsheet on the opposite side to bounce light back in.
Avoid these common lighting mistakes
- Direct midday sun through the window — too harsh; diffuse it with a sheer curtain or wait for cloud cover.
- Overhead room lighting only — creates unflattering downward shadows under eyes and nose.
- Mixing light sources — if you are using window light, turn off the overhead lights so the color temperatures do not clash.
Using an artificial light source
If natural light is not reliable in your space, a ring light or an LED panel works well. Place it at roughly eye level or slightly above, angled about 45 degrees to your face. A ring light positioned directly in front creates a flat but clean look that is common in professional headshots.
Step 3: Set up your camera or phone
You do not need a professional camera. Most modern smartphones can produce headshot-quality images if you use the right settings and avoid common pitfalls.
Smartphone tips
- Use the rear camera, not the front-facing selfie camera. Rear cameras have larger sensors and sharper lenses.
- Turn off beauty or skin-smoothing filters — they erase skin texture and make photos look artificial.
- Portrait mode (if your phone has it) applies background blur that looks more professional. Use it, but check that it handles hair edges cleanly before committing.
- Set a self-timer of 10 seconds so you have time to get into position and settle your expression before the shutter fires. Shoot in bursts if your phone supports it.
- Mount your phone on a tripod or prop it on a stable surface at chin height or slightly above. Looking slightly up into the lens is more flattering than looking down into it.
DSLR or mirrorless camera
If you have a dedicated camera, use a 50 mm or 85 mm equivalent focal length. These focal lengths compress facial features naturally and produce the proportions that headshots are known for. Shoot at a wide-ish aperture (f/2–f/2.8) to soften the background while keeping eyes sharp.
Camera distance
Position the camera about two to three feet (60–90 cm) from your face. Closer than that and wide-angle distortion will make your nose look larger than it is. Further than that and the background compression reduces, which is fine but may require more cropping later.
Step 4: Posing and expression
Expression carries as much weight as technical setup.
Body position
- Angle your shoulders about 15–20 degrees away from the camera, then turn your head back toward the lens. This breaks the flat, passport-photo look.
- Lean slightly forward from the waist — just an inch or two. It creates a subtle sense of engagement.
- Chin slightly down and slightly forward to define your jaw and avoid a double chin. Practice in a mirror once before you shoot.
Face and expression
- A natural, relaxed smile reads better than a forced grin. Think of something that genuinely amuses you, or have someone you trust say something funny a second before you press the shutter.
- If a smile does not match your professional context, a confident neutral expression works. The key is relaxed eyes — slightly narrowed ("squinting with the eyes") looks warm; wide-open eyes can read as anxious.
- Take at least 20–30 frames. Expressions change frame to frame; the best one rarely comes from the first few shots.
Framing
Aim for your face to fill roughly 60 percent of the frame. Your full head and the top of your shoulders should be visible, with a small amount of breathing room above the crown of your head. See our guide on how to choose the right headshot aspect ratio for platform-specific cropping guidance.
Step 5: Wardrobe and grooming
What to wear
- Solid colors in mid-tones (navy, charcoal, burgundy, forest green) photograph cleanly and do not date quickly.
- Avoid busy patterns — stripes, checks, and small prints create visual noise and can cause moiré on screen.
- Contrast with your background — if your background is a light grey wall, a white shirt blends in; a navy blazer stands out cleanly.
- Dress for the audience: business formal for corporate LinkedIn profiles, smart-casual for creative fields.
Grooming
- Blot any shine on your forehead, nose, or cheeks with a tissue before shooting. Shiny skin is amplified by camera sensors.
- Check your collar, lapels, and any visible jewelry in a mirror before each round of shooting.
- Hair should be arranged as you would wear it on a normal work day — not over-styled, not unkempt.
Step 6: Editing your best shots
Good editing enhances your photo without making it look edited.
What to adjust
- Exposure and contrast — brighten if the image looks flat, add a small amount of contrast to add depth.
- White balance — if the image looks too warm (orange) or too cool (blue), correct it until skin tones look natural.
- Spot removal — remove temporary blemishes, but leave natural skin texture intact.
- Sharpening — a small amount of sharpening on the eyes adds presence.
What to avoid
- Heavy skin smoothing or skin-blur filters — they make portraits look plastic.
- Liquify or feature-reshaping tools — these create uncanny results and look dishonest on a professional profile.
- Dramatic color grades or filters — your headshot should look like you, not like an Instagram post.
Free tools like Snapseed (mobile) or the free version of Lightroom work well for basic corrections. You do not need Photoshop.
Exporting and resizing
Export at full resolution first, then resize for your target platform. LinkedIn accepts images up to 8 MB and works best with a square crop at least 400×400 px — though uploading 1000×1000 px gives you more flexibility if the platform crops it. Use our LinkedIn headshot resizer or photo resizer tool to hit the exact dimensions without losing quality.
When a DIY headshot is not enough
A home shoot covers most professional needs. But if you need something that looks identical to a studio portrait — consistent lighting, high-end retouching, or a specific branded background — a DIY photo is a starting point, not a final product.
One option that bridges the gap: upload your best home photo to FastHeadshot's AI generator. It applies studio-grade lighting and background treatment to your selfie or home shot, producing results that are difficult to distinguish from a dedicated studio session. See pricing options if you want to explore that route.
For a full comparison of DIY vs. professional approaches, read can a professional headshot be a selfie?
Frequently asked questions
Can I take a good headshot with just my phone?
Yes. Most smartphones released in the last three years have cameras capable of producing headshot-quality images. The critical factors are lighting and distance — a phone with good natural light beats a camera with bad lighting every time. Use the rear camera, enable portrait mode if available, and mount the phone so it is stable.
What is the best background color for a home headshot?
Light grey, off-white, and warm white are the safest choices because they work with most skin tones and suit most professional contexts. If you want something more distinctive, a deep navy or dark teal can look elegant against lighter clothing. Avoid pure white unless you have enough light to keep it from blowing out.
How many photos should I take?
Shoot at least 30–50 frames per setup. Expressions shift subtly from frame to frame and it is impossible to predict which frame will capture the right combination of relaxed eyes, natural smile, and sharp focus. More frames mean more options at the editing stage.
How do I avoid shadows on my face?
Shadows come from a light source that is too directional or too high. Soften the source (diffuse window light or a softbox), lower the angle so it is closer to eye level, and use a white reflector card on the shadow side to fill in the dark areas.
Do I need a ring light?
No. A ring light is convenient but not essential. A large window on a cloudy day produces softer, more flattering light than most ring lights. If you only have a small window or shoot in the evenings, a basic LED panel positioned at 45 degrees works well and costs less than a ring light.
Related articles
Headshot Aspect Ratio Guide: Best Ratios for Every Use
Learn which headshot aspect ratio to use for LinkedIn, websites, resumes, and social media. Quick-reference table and practical cropping tips included.
AI Headshot Prompts: Write Better Prompts for Pro Results
Learn the exact 4-part formula for writing AI headshot prompts that produce studio-quality results. Includes copy-paste examples for every industry.
AI vs Traditional Headshots: Cost & Quality Compared
Comparing AI headshots vs traditional photography on cost, quality, speed, and professional perception — so you can choose the right option for your needs.